
The Cronus Zen Guide by Stealth Gamer
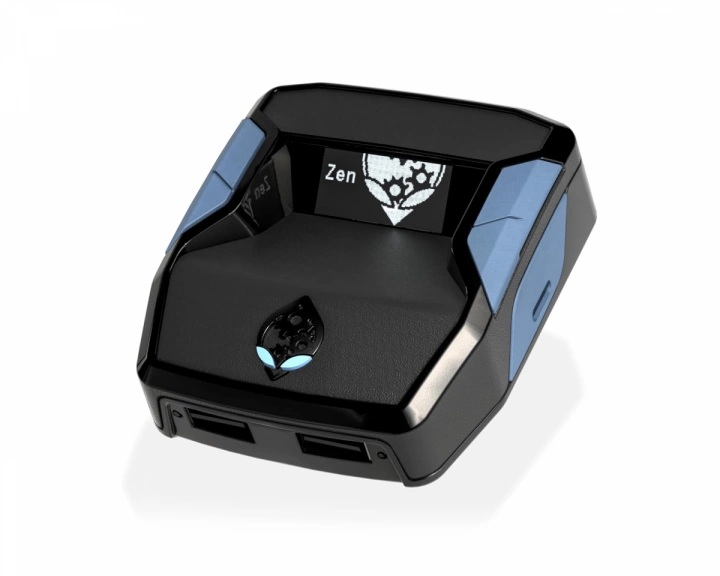
Cronus Zen with Zen Studio Live and Zen Link
Update and configuration via Zen Studio Live
Compatible with PS5, PS4, Xbox Series and Xbox One
Quick mod installation with Zen Studio Live
Product stocked in our warehouses in France
Fast shipping within 24 to 48 hours depending on stock
Updating and configuring the Cronus Zen with Zen Studio Live
Fully integrated into your web browser, Zen Studio Live does not require any software installation. This makes it simpler, faster, and more accessible to use, whether on PC or Mac, as well as on systems compatible with Chromium-based browsers, such as Linux or ChromeOS.
Important: update and configure your Cronus Zen as soon as you receive it, before using it on console.
Updating the Cronus Zen
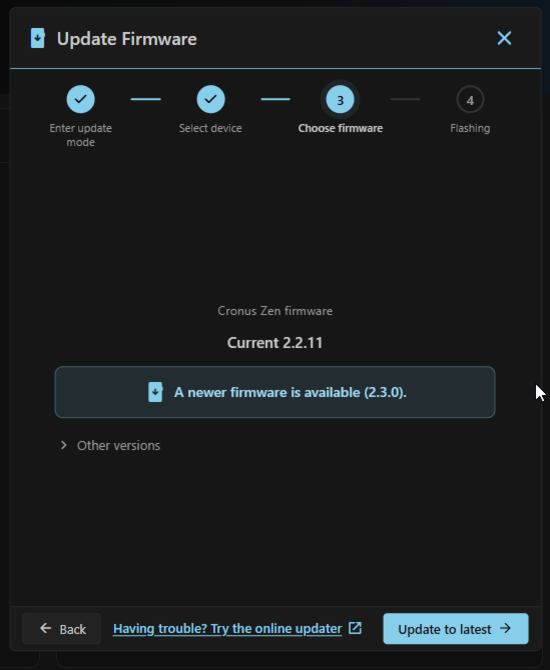
The first step in configuring the Cronus Zen is always to update it.
To get started, go to:
https://zenstudio.collectivemindsstore.com/
Then connect your Cronus Zen to your computer using the USB-C port located at the back of the Cronus.
When plugging it in, hold down the small blue button underneath the Cronus Zen to launch the connection mode required for the update.
Then click Connect Device, and select your Cronus Zen in the pop-up window that appears on screen.
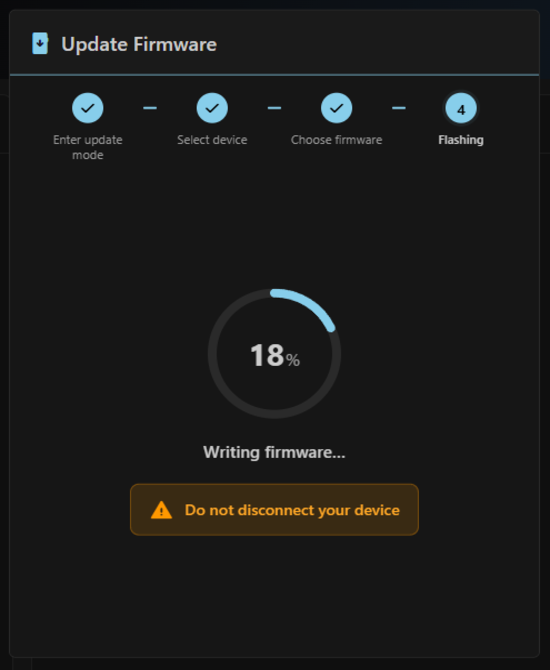
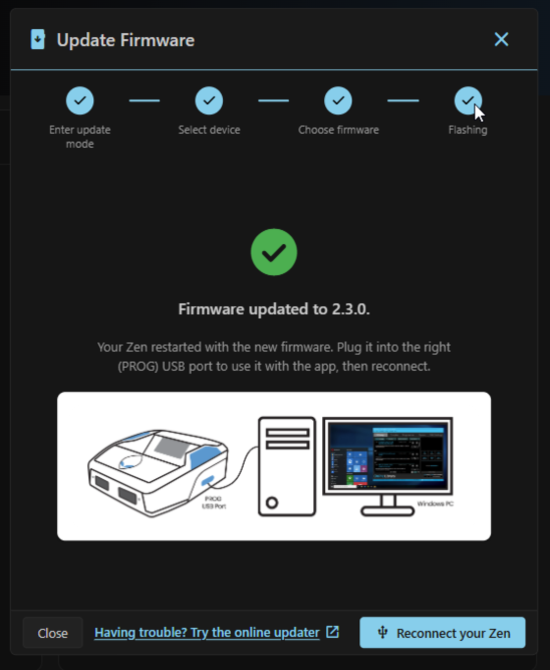
Once the Cronus is connected, click the Update Device button, located at the bottom left of the interface, to start the update.


How to install mods on the Cronus Zen?
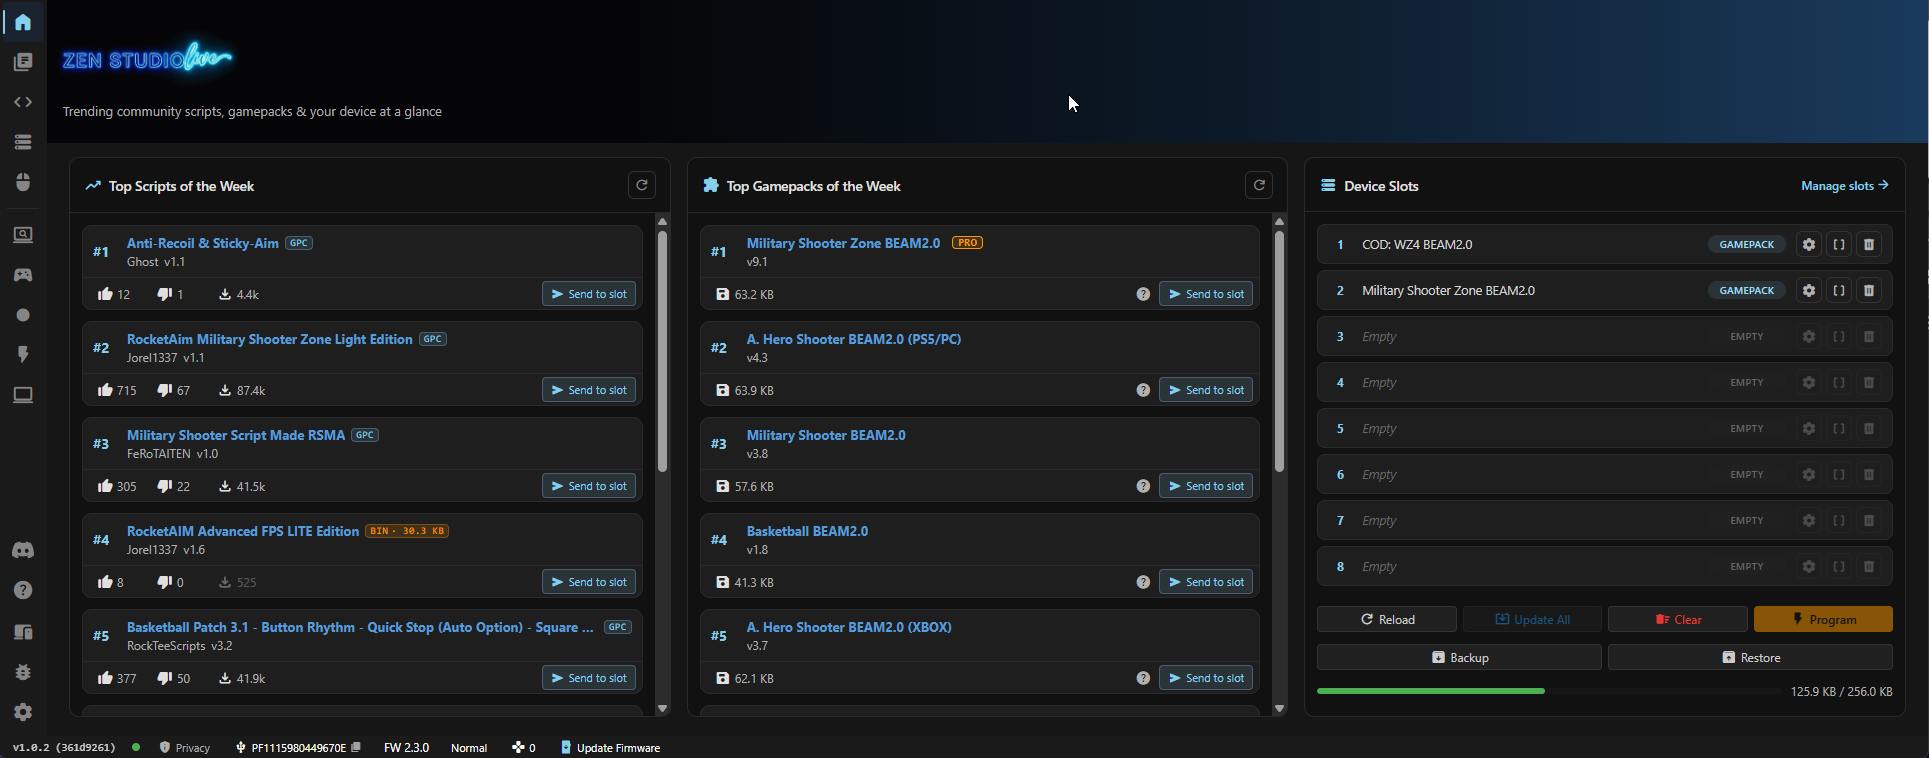
The main menu is organized into three columns. The left column displays a selection of the most popular scripts at the moment. The center column offers a selection of the best available mod packs. Finally, the right column shows the mods and scripts already installed on your Cronus Zen.
The Cronus Zen has a total of 8 slots, which you can use to install mods or scripts according to your needs.
The two 3 m cables are mainly designed to connect the Cronus Zen to the console via the rear port, and to connect the controller to the Cronus. They can also be used to connect the Cronus Zen to a PC via the right-side port, in order to continue the configuration with Zen Studio Live.
The short 20 cm cable is intended for updating the Cronus Zen, which is an essential step before first use. Depending on your setup, it can also be used to connect the Cronus Zen to the console.
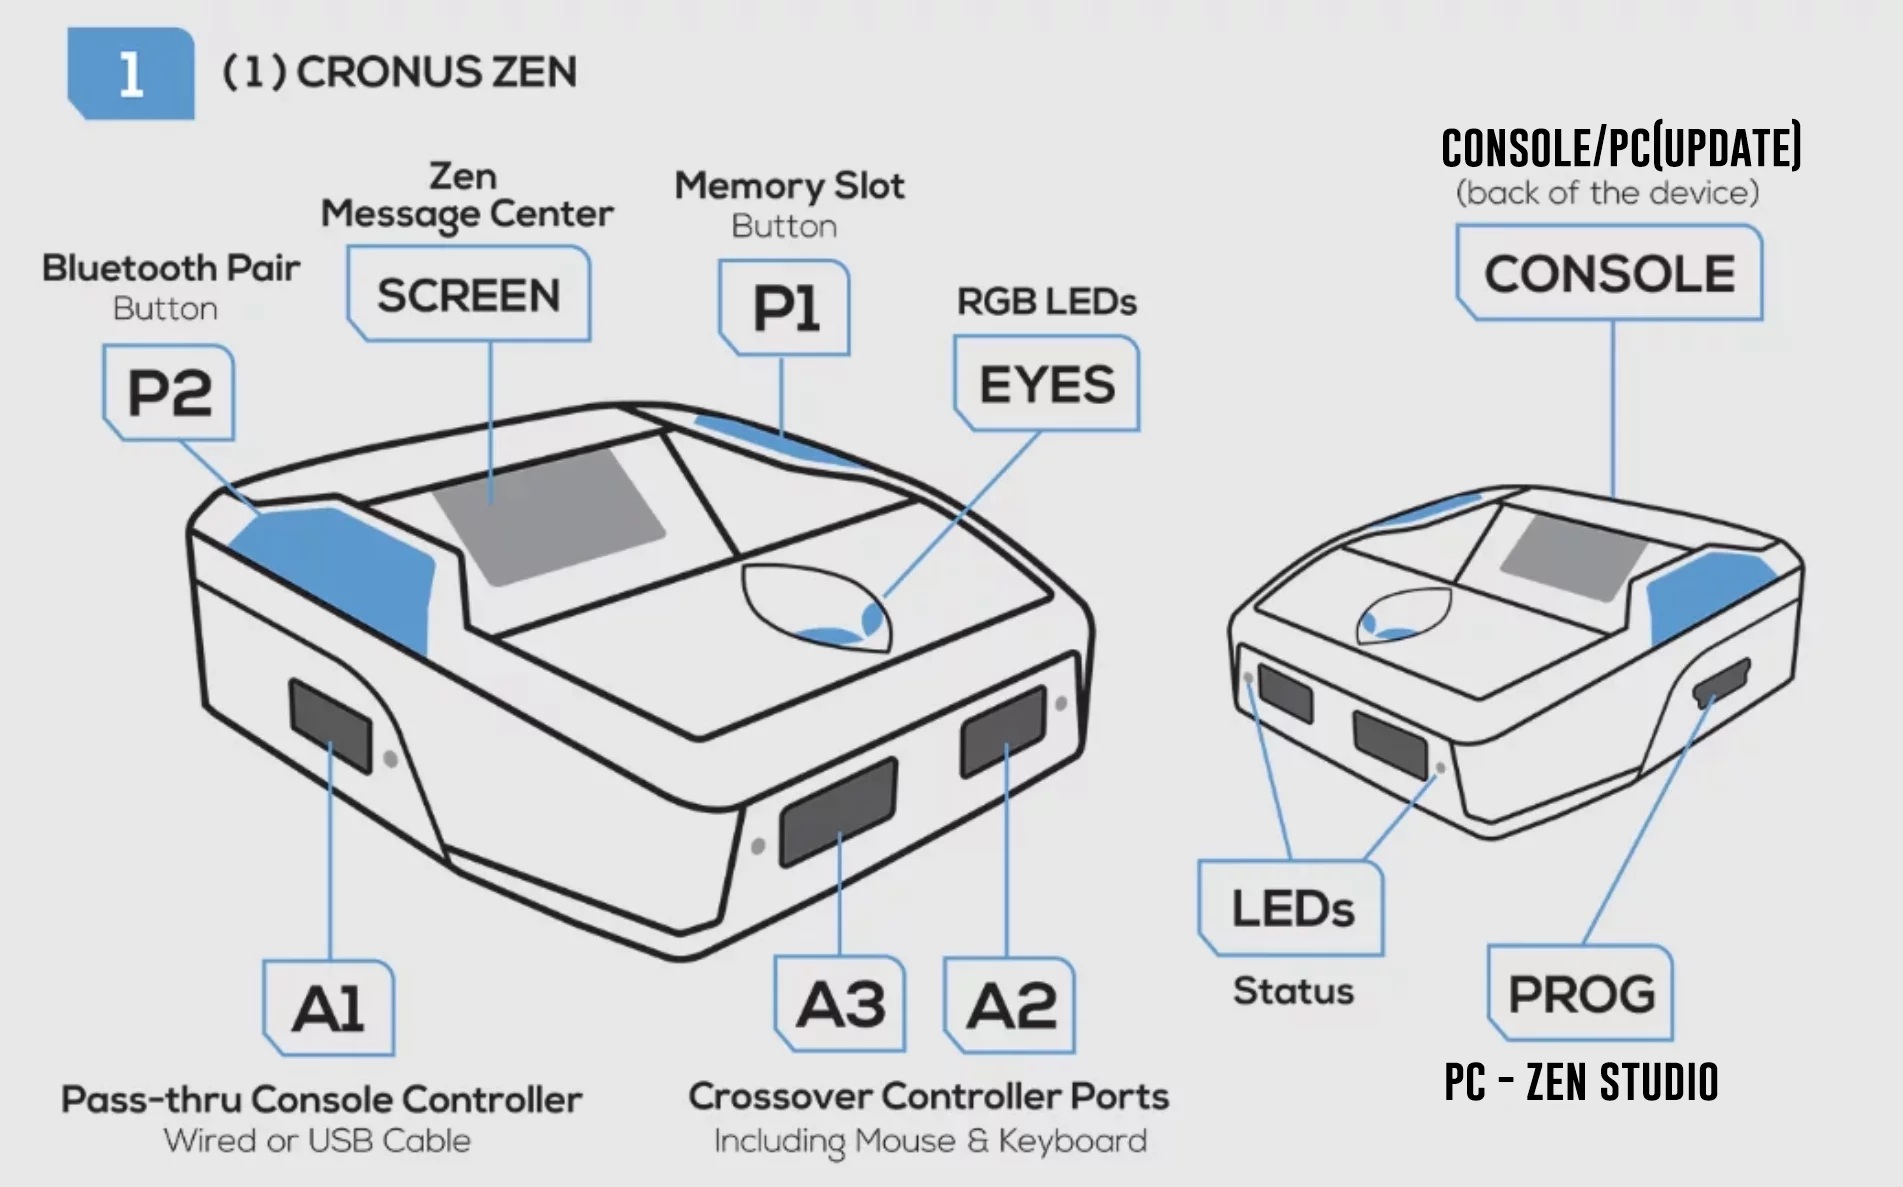
The connection method may vary depending on the console being used. The different procedures are detailed later in this guide.
When the Cronus Zen is connected to the console, you can use the right button on the device to switch from one slot to another. The order of the mods matches the 8 memory slots configured in Zen Studio Live.
Each mod pack displays its logo on the Cronus Zen screen. The screen also shows the button combination to perform on the controller in order to access the configuration of the different mods.
Update the Cronus Zen again
In most cases, a recent update can solve operating issues. Even if you have already completed this step, we recommend running the procedure again.
This can reset the Cronus Zen if it is experiencing a bug, a freeze, or unusual behavior.
Important: to start the update correctly, make sure you hold the button located underneath the Cronus Zen while plugging it into your PC.
Perform a manual reset of the Cronus Zen
In case of a crash, freeze, or an error code such as E2021 or 3001, a manual reset may be required.
To do this, hold down the two blue buttons located on the front of the Cronus Zen, on the left and right sides, then plug the device into your PC without releasing the buttons.
This procedure clears the Cronus Zen memory and allows you to start again from a clean base. Once the procedure is complete, you will need to update the device again, then reconfigure your profiles and settings.
Depending on the error code encountered, especially E2021 or 3001, it may be necessary to perform this procedure using both the rear port and the side port, in order to fully reset the Cronus Zen.
The Cronus Zen on PS5 and Xbox Series
The Bypass and Remote Play methods are free solutions, but they involve a few additional steps that need to be repeated each time you start your PS5. This can make the setup process slightly longer at the beginning of each gaming session.
Zen Link, sold separately, is a much more convenient alternative. Once configured through a simple one-time setup, it allows your Cronus Zen to connect automatically to the PS5 without having to repeat the process every time, making daily use smoother and more efficient.
On Xbox consoles and last-gen consoles, such as PS4 and Xbox One, the Cronus Zen is fully Plug & Play.
No Bypass, no Remote Play, and no additional accessory are required: simply connect the device and start playing right away.
No Bypass, no Remote Play, and no additional accessory are required: simply connect the device and start playing right away.
ZenLINK™ Setup – Quick Guide
Step 1: PC & Wi-Fi Connection
- Connect your Windows® PC to your Wi-Fi network (the same network as the PS5®).
- Temporarily disable any Ethernet connection (LAN cable).
- Make sure you are connected to the 2.4 GHz band.
- If your router offers two separate SSIDs (2.4 GHz and 5 GHz), manually select the 2.4 GHz network.
Step 2: ZenLINK™ Configuration
- Install Zen Studio 1.6.1 Build 20 or a newer version (includes the ZenLINK Configurator Tool).
- Hold down the blue button on the ZenLINK™, then plug it into your Windows® PC.
- Wait until the LEDs turn purple.
- Launch the ZenLINK Configurator Tool (right-click the shortcut > Run as administrator).
- Click Read Settings From Windows®.
- If this fails, check that you are connected to the 2.4 GHz band.
- Click Load Console Data, then Save All To Device.
- Then click Restart Device (do not unplug the device).
- Orange LEDs: Wi-Fi connection successful.
- Red LEDs: connection failed.
- If an update is available, the LEDs will flash blue. Do not unplug the device until the update is complete.
- Once complete, the LEDs turn orange again: the ZenLINK™ is ready.
Note: You can now switch back to an Ethernet connection or 5 GHz Wi-Fi if you wish.
Step 3: Connection to the PS5®
- Connect the ZenLINK™ to USB port A1 (left) on the Cronus Zen™.
- Connect the Cronus Zen™ to the PS5® via the USB CONSOLE port.
- ZenLINK™ LED = orange (Wi-Fi connection successful).
- Connect the DualSense® controller to USB ports A2 or A3 on the Cronus Zen™.
- ZenLINK™ LED = green (controller synchronized).
- As soon as a PS5® game is launched, the LED turns blue: everything is ready.
ZenLINK™ Buttons
- Configuration mode: hold down the blue button when connecting to the PC until the LED turns purple.
- Factory reset: insert a paperclip into the Reset hole underneath, hold it while connecting to the PC until the LED turns purple, then flashes red.
First, you need to configure the PS5:
1: In the system settings, enable Remote Play.
2: In the power saving settings, under rest mode settings, enable the option allowing the console to be started via the internet.
3: In the controller settings, make sure the connection is set to USB only. It is also recommended to unpair the controllers from Bluetooth to prevent your controller from connecting directly to the console instead of the Cronus Zen.
We will now configure your PC for Remote Play.
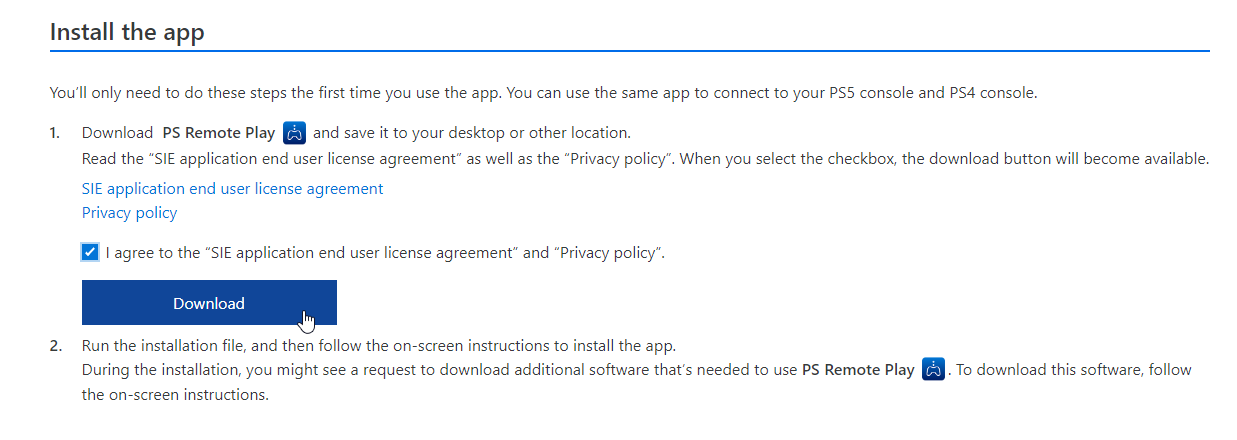
1: Download the Remote Play software for Windows.
2: Set up Remote Play on your computer. When launching the software for the first time, you will be asked to sign in to your PSN account.
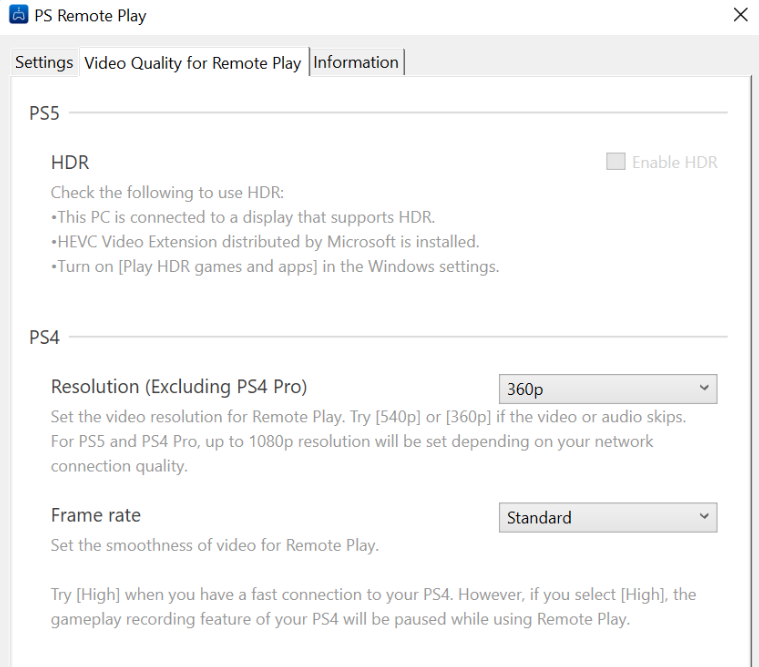
3: Configure the Remote Play video quality. Since the goal here is not to play on your PC, we recommend setting the video quality to the minimum setting, 360p, to save bandwidth.
4: You can now connect your hardware. Connect the Cronus Zen to the PC using two cables: one connected to the rear port of the Cronus Zen, and one connected to the PROG port, located on the right side.
5: Launch Zen Studio and, in the Device tab, check Enable PS Remote Play.
6: Connect a DualSense controller to port A1, located on the left side of the Cronus Zen.
7: Launch the Remote Play software on your PC and select your PS5. From this step onward, you can focus on the gaming screen connected to your console.
8: You are now ready to play. Pay attention to the LED color on your controller: it should be white in the menus and blue when you launch a game. A blue light on both the Cronus and the controller confirms that the connection is working correctly.
9: If you experience a bug, unplug and reconnect the controller. If needed, press the reset button located underneath the Cronus to force a manual reset of the Remote Play connection.
This guide assumes that you have completed the initial setup of the Cronus Zen and that the device is up to date.
First, you need to configure the PS5:
1: In the system settings, enable Remote Play.
2: In the power saving settings, under rest mode settings, enable the option allowing the console to be started via the internet.
3: In the controller settings, make sure the connection is set to USB only. It is also recommended to unpair the controllers from Bluetooth to prevent your controller from connecting directly to the console instead of the Cronus Zen.
We will now configure your Android device for Remote Play.
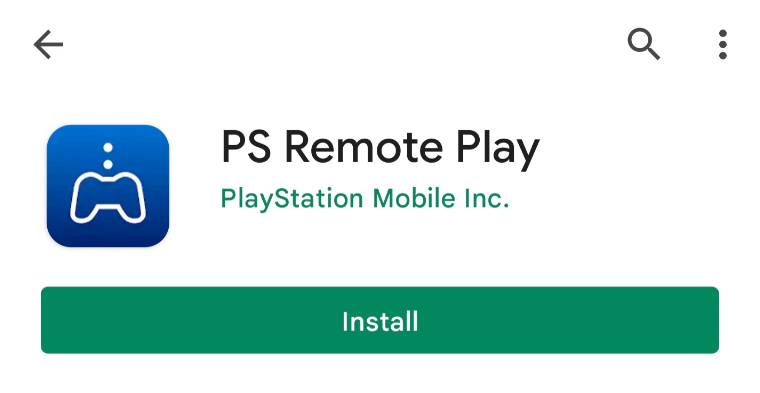
1: Download the PS Remote Play app on your smartphone or tablet.
2: Open the app and configure your PSN account.
3: Configure the Remote Play quality settings: 360p resolution and high frame rate.
4: Enable Remote Play on your console.
5: Connect your Cronus Zen to Zen Studio and select PC/Mobile as the output protocol.
6: Connect your controller to port A1 on the Cronus, then connect your Cronus Zen to your Android device using an OTG cable.
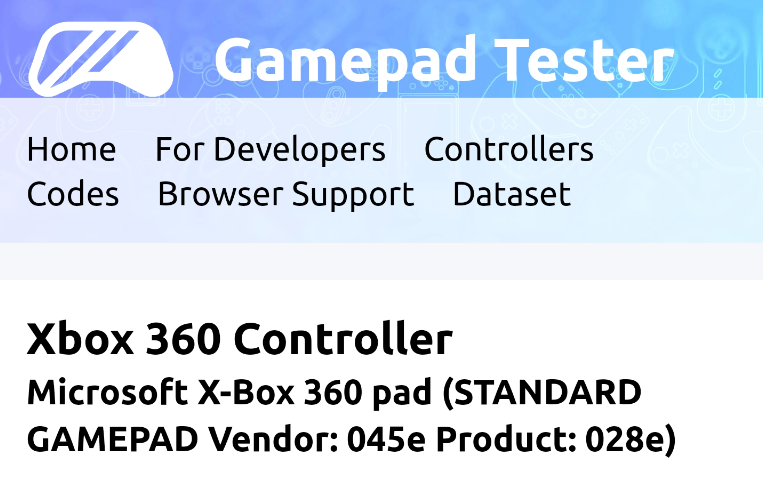
7: You can check that the controller is properly connected to your phone using the Gamepad Tester tool.
This guide assumes that you have completed the initial setup of the Cronus Zen and that the device is up to date.
Several limitations are unavoidable when using local or online Remote Play. Titles that require PlayStation® VR or other peripherals such as the PlayStation® Camera are not compatible with PS Remote Play. DUALSENSE® support is available on Android devices running Android 12 or later, iPhone and iPad running iOS 14.5 or later, Windows PCs running Windows 10 or later, and Macs running macOS 11.3 or later. DUALSHOCK4® support is available on Android devices running Android 10 or later, iPhone and iPad running iOS 13 or later, Windows PCs running Windows 10 or later, and Macs running macOS 10.15 or later.
DUALSHOCK4® features such as the touch pad, motion sensor, light bar, and vibration may not be available. The availability of DUALSENSE® features, such as audio output and haptic effects including adaptive triggers, may vary when using Remote Play. Some features may be unavailable. Refresh rates above 60 Hz may not be supported with most PS5 games.
For the best gaming experience, it is recommended to have a ping below 20 ms and an upload speed of at least 5 Mbps.
Bypass and Remote Play solutions do not apply to Xbox players, who can connect the Cronus directly to the console via USB.
Xbox controllers with the Cronus Zen
To play on Xbox Series X/S consoles, Xbox controllers must be connected to the Cronus Zen using a wired USB connection. It is not possible to use the Cronus Bluetooth connection to pair an Xbox controller.